Electric Guitar Kit CST-24T : Needs a lot to make it work really well
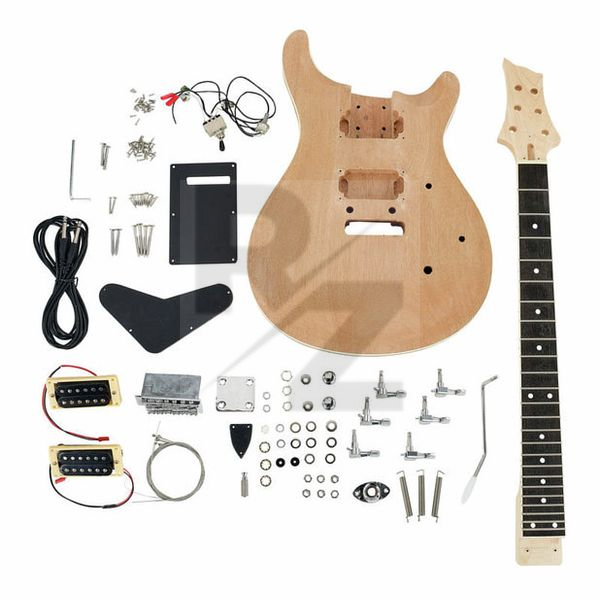
Here’s why I decided to buy this guitar kit. I’m 40 years old with 7 years of learning piano and music theory when I was a kid and then some experience with local bands as a singer and songwriter. I can play guitar a bit more than cowboy chords, when you watch videos like “see my guitar progress in a year”, I’m somewhere in 8-10th month :) But now i want to improve my skills. I already had an electric guitar at the time of purchase of this kit, a top-of-the-line Ibanez RG, but when I got back to guitar lessons, I understood that Ibanez is too complicated for setup (changing strings and getting the floyd rose guitar back to tune is a nightmare for a non-exprerienced player) and it’s too expensive in case I spoil something trying to set it up.
So I decided to buy this kit and build my own guitar, that I won’t be afraid to adjust or modify while improving my guitar skills. I was also hoping to have fun with the process and save some money comparing to buying a complete guitar of the same quality.
I chose CST24T because it’s a good looking one and has a shorter scale with 24 frets, I also wanted a humbucker-sized cutouts in the body so I would be able to install any kind of pickups later without cutting the body. I didn’t care much about tremolo, but I chose this version because it’s easier to adjust intonation of each string compared to a non-tremolo CST24.
So I got a guitar kit and started with the neck. Lots of reviewers here have mentioned that fret ends need grinding and frets themselves need polishing. That’s all true. So you need a file, a polishing compound, masking tape, a cloth and a few spare hours to make it really playable. Then the fretboard is really dry, so you need lemon oil.
Then 1to the body. I wanted to stain the wood in a few layers (staining-sanding-staining etc) to make its structure more visible. Well, first you need to sand off the factory applied sealer and get access to the wood pores if you want to use stain, and not paint or just clear-coat. So you need an orbital sander, sanding paper and a few more hours to proceed. And then you have to realise that rengas is not at all the wood with a nice structure that you should expose with staining. For a beautiful staining you need to glue a maple veneer on top which I decided not to do.
Ok. You have it painted, assembled and adjusted - then the guitar gets quite playable with low action and minimal buzz. You can make it even better with fret levelling.
So here we come to the two main cons of this guitar.
1. Pickups. They just make some sound and that’s it. I ordered a pair of no name split coil humbuckers on eBay and they made it sound so much better….
2. Location of a volume pot. It’s different from a complete CST24 guitars and it’s really on the way of your right hand. After a month of playing I decided to drill another hole and relocate it.
Because of this I suggest to assemble and try this guitar first - you would understand what you want to improve and what you’re happy with as it is. Then you can order all the parts you need and go on with painting, polishing frets etc.
Please don’t buy this kit if you want to save money or you don’t have time. Better look at ready to play guitars. With all the tools and materials I think I already spent 200-250 euros (kit itself, new pickups, tools, paintwork etc) and a few full days. I’m quite happy with the result (giving it 5 stars) but now I’m buying a complete JA-60 instead of getting a JA-style kit.
Technical Data
- Manufactured by Harley Benton
- Released in 2020
- Average price : $96
You may also like
2023 100%
2023 100%
2023 100%
2023 100%

2023 100%
2023 100%
2023 100%

2023 100%

2023 100%

2023 100%